How to Submit Your Website to Google Search Console and Get Indexed Faster (2026)
Publishing a website does not automatically guarantee that it will appear in Google Search results. Although Google's bots continuously crawl the web, it may take days or even weeks before they discover a newly launched website.
The fastest and most reliable way to introduce your website to Google is by using Google Search Console. This free tool allows you to verify ownership of your website, submit your XML sitemap, request indexing for important pages, and monitor how Google crawls and indexes your content.
Whether you've just launched a blog, an online business, a portfolio, or an educational website, setting up Google Search Console should be one of your first SEO tasks.
In this complete guide, you'll learn how to submit your website to Google Search Console correctly and discover proven techniques that can help your pages get indexed faster.
What Is Google Search Console?
Google Search Console is a free tool provided by Google that helps website owners monitor and improve their website's performance in Google Search.
Using Search Console, you can:
- Submit your website to Google.
- Verify website ownership.
- Submit XML sitemaps.
- Request indexing for new pages.
- Track search performance.
- Find indexing issues.
- Monitor Core Web Vitals.
- Improve your website's SEO.
Without Search Console, you'll have limited visibility into how Google views your website.
Why Should You Submit Your Website?
Submitting your website helps Google discover your content more efficiently.
Benefits include:
- Faster page discovery.
- Quicker indexing of new articles.
- Better monitoring of crawl activity.
- Early detection of technical issues.
- Improved search visibility.
- Accurate indexing reports.
Although Google can eventually find websites through backlinks and internal links, manually submitting your website speeds up the process significantly.
Requirements Before You Start
Before submitting your website, make sure you have the following:
- A live website.
- A Google account.
- An XML sitemap.
- Access to your hosting account or DNS settings.
- Administrator access to your website.
Once these requirements are ready, you can begin the setup process.
What You'll Learn
In the next part of this guide, you'll learn how to:
- Create a Google Search Console property.
- Choose between Domain Property and URL Prefix.
- Verify your website ownership.
- Submit your XML sitemap.
- Use the URL Inspection Tool.
- Request indexing for individual pages.
- Monitor indexing status.
- Solve common indexing problems.
By the end of this tutorial, you'll know exactly how to help Google discover, crawl, and index your website efficiently.
Step 1: Sign in to Google Search Console
Open Google Search Console using your preferred web browser and sign in with your Google account.
If you manage multiple websites, make sure you use the same Google account that you want to use for managing your website.
After signing in, you'll be asked to add a new property.
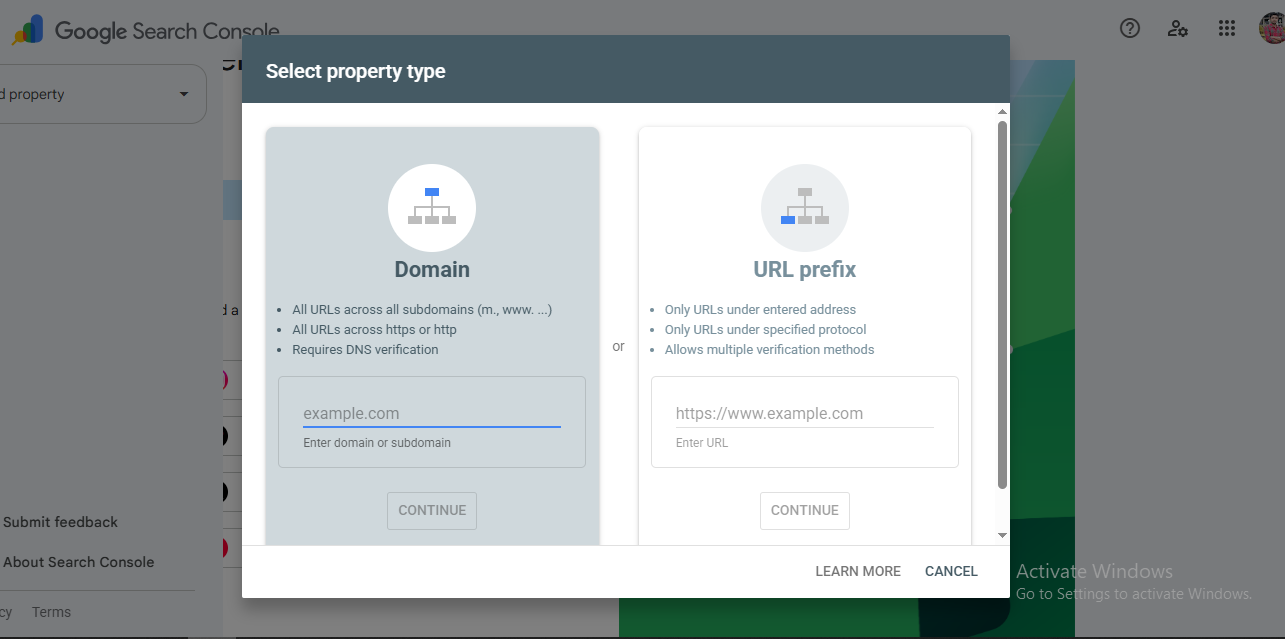
Step 2: Add Your Website Property
Google Search Console offers two different property types.
- Domain Property
- URL Prefix Property
Domain Property
This option includes every version of your website, including HTTP, HTTPS, www, and non-www versions.
Example:
incomeva.com
Google automatically tracks:
- https://incomeva.com
- http://incomeva.com
- https://www.incomeva.com
- http://www.incomeva.com
This is the recommended option for most website owners.
URL Prefix Property
The URL Prefix option tracks only the exact URL that you enter.
For example, if you add:
https://incomeva.com
Google will not automatically include the www or HTTP versions.
This option is easier to verify but covers only one specific version of your website.
Step 3: Verify Website Ownership
Google requires proof that you own the website before providing search data.
Choose one of the following verification methods.
Method 1 — DNS TXT Record (Recommended)
This is Google's preferred verification method.
- Copy the TXT record provided by Google.
- Open your domain registrar or DNS management panel.
- Add the TXT record exactly as provided.
- Save your changes.
- Return to Google Search Console and click Verify.
DNS changes may take several minutes or a few hours to propagate.
Method 2 — HTML File Upload
Google provides a verification HTML file.
Upload this file to your website's root directory.
For most hosting providers, the correct location is:
public_html/
Do not rename or modify the file.
After uploading, click the Verify button.
Method 3 — HTML Meta Tag
Google also provides a verification meta tag.
Copy the code and place it inside your website's <head> section.
<meta name="google-site-verification"
content="xxxxxxxxxxxxxxxx">
Save the page and return to Search Console.
Method 4 — Google Analytics
If Google Analytics is already installed using the same Google account, Search Console can verify ownership automatically.
Method 5 — Google Tag Manager
If your website already uses Google Tag Manager, verification can also be completed through your GTM container.
Which Verification Method Should You Use?
| Method | Difficulty | Recommended |
|---|---|---|
| DNS Record | Medium | ⭐⭐⭐⭐⭐ |
| HTML File | Easy | ⭐⭐⭐⭐⭐ |
| Meta Tag | Easy | ⭐⭐⭐⭐ |
| Google Analytics | Easy | ⭐⭐⭐ |
| Google Tag Manager | Easy | ⭐⭐⭐ |
Step 4: Verification Complete
Once Google successfully verifies your ownership, your website property becomes active.
You now have access to all Search Console features, including:
- Performance Report
- URL Inspection Tool
- Sitemaps
- Indexing Report
- Core Web Vitals
- Manual Actions
- Security Issues
If your website is brand new, don't worry if these reports appear empty. Google needs some time to collect search data.
Common Verification Errors
- Uploading the HTML verification file to the wrong folder.
- Deleting the verification file after verification.
- Adding the meta tag outside the <head> section.
- Incorrect DNS TXT record.
- DNS propagation has not completed.
- Using a different Google account than the one that owns the property.
Double-check each step if verification fails.
Quick Checklist
- ✔ Sign in with your Google account.
- ✔ Add your website property.
- ✔ Choose Domain Property whenever possible.
- ✔ Verify website ownership.
- ✔ Confirm successful verification.
After your website has been verified, the next step is submitting your XML sitemap and requesting Google to crawl and index your pages more efficiently.
Step 5: Submit Your XML Sitemap
After successfully verifying your website, the next important step is submitting your XML sitemap.
An XML sitemap helps Google discover all the important pages on your website. Instead of waiting for Google to find every page naturally, the sitemap provides a structured list of URLs that should be crawled and indexed.
Submitting a sitemap is one of the easiest ways to improve the indexing process for new websites.
What Is an XML Sitemap?
An XML sitemap is a special file that lists the important pages on your website.
It provides Google with useful information such as:
- Available URLs
- Last modified date
- Update frequency
- Page priority
Most websites place the sitemap at:
https://yourdomain.com/sitemap.xml
Example:
https://incomeva.com/sitemap.xml
How to Submit Your Sitemap
- Open Google Search Console.
- Select your website property.
- Click Sitemaps from the left navigation menu.
- Find the Add a new sitemap section.
- Enter:
sitemap.xml
Click the Submit button.
If your sitemap is valid, Google will display a Success status.
What Happens After Submission?
Submitting a sitemap does not guarantee immediate indexing.
Instead, Google adds the sitemap to its crawling queue and starts discovering the URLs listed inside it.
Depending on your website's authority, crawl budget, and content quality, indexing may take anywhere from a few minutes to several weeks.
Step 6: Use the URL Inspection Tool
The URL Inspection Tool allows you to check whether a specific page has already been indexed.
Simply paste the full page URL into the search bar at the top of Google Search Console.
Example:
https://incomeva.com/blog/how-to-submit-your-website-to-google-search-console
Google will analyze the page and display its current indexing status.
Possible URL Status Messages
| Status | Meaning |
|---|---|
| URL is on Google | The page has already been indexed successfully. |
| URL is not on Google | The page has not been indexed yet. |
| Discovered – Currently Not Indexed | Google knows about the page but hasn't crawled it yet. |
| Crawled – Currently Not Indexed | Google visited the page but decided not to index it at this time. |
| Excluded by Noindex | The page contains a noindex directive. |
Step 7: Request Indexing
If you've just published a new article or updated an important page, you can ask Google to crawl it immediately.
- Open the URL Inspection Tool.
- Paste the page URL.
- Wait for Google to inspect the page.
- Click Request Indexing.
Google will place your page in its priority crawling queue.
This usually speeds up the indexing process, although there is no guaranteed timeframe.
How to Check if Your Page Is Indexed
There are two simple ways to check whether Google has indexed your page.
Method 1: Google Search Console
Use the URL Inspection Tool to see the indexing status.
Method 2: Google Search
Search using the following operator:
site:yourdomain.com/page-url
Example:
site:incomeva.com/blog/how-to-submit-your-website-to-google-search-console
If Google displays the page, it has been indexed.
Why Isn't My Website Indexed?
Many new website owners expect instant indexing, but several factors can delay the process.
Common reasons include:
- Your website is newly launched.
- No XML sitemap has been submitted.
- Poor-quality or thin content.
- Duplicate content.
- Pages blocked by robots.txt.
- Noindex meta tag.
- Server errors.
- Very few internal links.
- No backlinks from other websites.
Tips to Get Indexed Faster
- Submit your XML sitemap.
- Use the URL Inspection Tool to request indexing.
- Publish original, high-quality content.
- Create strong internal links.
- Ensure pages are not blocked by robots.txt.
- Remove accidental noindex tags.
- Improve website loading speed.
- Share new articles on social media.
- Earn backlinks from trusted websites.
- Update your website regularly with fresh content.
Common Beginner Mistakes
- Publishing pages without submitting a sitemap.
- Expecting indexing within a few minutes.
- Ignoring Search Console error reports.
- Submitting duplicate pages repeatedly.
- Deleting important pages without redirects.
- Using copied or AI-generated low-quality content without editing.
Summary
Submitting your website to Google Search Console is one of the first and most important SEO tasks for any website owner. By verifying your website, submitting an XML sitemap, using the URL Inspection Tool, and requesting indexing for important pages, you make it easier for Google to discover and understand your content.
Remember that indexing depends on many factors, including content quality, website structure, crawlability, and authority. Focus on creating valuable content, maintaining a technically healthy website, and regularly monitoring Google Search Console to achieve the best long-term SEO results.
Related Articles
- Google Search Console Complete Setup Guide
- How to Create an XML Sitemap
- Robots.txt Explained for Beginners
- How Google Indexing Works
- Technical SEO Checklist
- Complete On-Page SEO Guide